If you’re anything like me, planning implementing ministry programs can easily take center stage, leaving your workspace in a state of chaos. In my experience, kid’s ministry leaders are often intrinsically organized. We are just wired that way. But add in a special event or VBS, and systems we have in place can easily go off the rails.
This article is created to literally help you get your supplies and space back on track, providing specific encouragement to help you breathe easier and enjoy your workspace. So, let’s begin!
Choose a Space

A single space. Start with just one. Maybe even something as small and specific as a drawer, that wonky cabinet in your workroom, or the top shelf of a closet. Go ahead and choose somewhere to start. You can do it.
The next three steps are linked and work most successfully when you think of them as a trio: KEEP, TOSS, and SHARE. When tackling a space, you must physically touch every item in that space and make a decision as to whether it stays or goes—either to the garbage or to a worthy organization that can use it.
KEEP
Is this something that is extremely functional in your ministry? Does it have sentimental meaning that runs deep? Does someone you’re sharing the space with have a deep connection to it? If the answer to any of those questions is yes, you should likely keep the item. If the answer is no, the next step is to decide if you should TOSS it or SHARE it.
TOSS
TOSS things that are stained or broken. It’s really that simple.
SHARE
I am a strong believer in SHARING things we no longer use or need. There are so many organizations in this world that can use your stuff (but not your garbage). I suggest finding a cause that is important to you and investigating if they have a donation site. I’m guessing your church has several ministry partners you can choose from.
However, I am also a strong believer in getting this stuff out of your space in a timely manner. Remember that your SHARING is a blessing to others.
In summary, choose a space, decide if you are going to KEEP, TOSS, or SHARE every single item. Then clean the space and return the items to the space in an orderly fashion.
Too Overwhelmed to Organize?
It’s easy to feel overwhelmed and not know where to start to climb out of the chaos.
Life can get busy. Paperwork piles up. Piles of “stuff” grow taller than the children you serve. It’s easy to feel overwhelmed and not know where to start to climb out of the chaos. I’m here to tell you—you can do it.
For me personally, a cluttered, chaotic space contributes to my life feeling cluttered and chaotic. The biggest step is to literally take a deep breath and begin.
Choose a single space to tackle and assign a date and time to have the task completed. Put it in your calendar. Next, have an internal dialogue with yourself. Be kind with your words. Tell yourself that it’s okay that things have gotten away from you.
Once you’ve chosen a project, committed time to it, and given yourself a positive pep talk then it’s time to prepare. Do you need any tubs bins, containers, or shelves? Take a tangible step and procure your supplies.
If you don’t have a budget for anything new, consider reaching out to your church community with a very specific ask. You’d be surprised at how many empty nesters have tubs and bins to spare!
When it’s time to begin, determine what you will KEEP, TOSS, and SHARE. Now, do this one project from start to finish and then my friend, be proud of yourself! You’ve gotten that project done. Fantastic!
Too often we beat ourselves up because the project feels insignificant compared to the enormity of other projects we have yet to complete. Be kind to yourself and then pick the next project to tackle. You can do it, and it will invite more peace and simplicity into your ministry along the way.
Organize Your Workspace
“If a cluttered desk is a sign of a cluttered mind, of what, then, is an empty desk a sign?”
Albert Einstein
I have always related to this quote. My desk is often a place where things get stacked: papers, pictures, magazines, mail … piles and piles and piles until I wade through everything and bring peace back to my workspace.
So, why bother to organize your workspace?
Before we built the office addition to our home, my desk—the hub of family planning with our small children—was in the middle of our kitchen. Keeping things organized helps with the overall aesthetic of the family space and can bring calm to the entire household.


Desktop
Grab a garbage can. Sit at your desk and survey everything that sits on top of it. Move each item to another spot, with the goal being a completely empty workspace. Apply the principles of KEEP, TOSS, and SHARE to each item. There likely isn’t much to share in this zone.
If you have a lot of papers, invest in some basic file folders and group like papers together. You may choose to have a tabletop file folder or box if you don’t have a file drawer accessible at your desk.
Desk Drawers
Move on to desk drawers and empty those out next. Keep a piece of blank paper on hand to test all markers and pens. TOSS any that are drying up. If you can purchase a drawer organizing system with cubbies and spots for lots of knickknacks, great.
If not, use rubber bands to hold extra writing utensils together, and use snack-sized plastic zipper bags for items such as extra keys and miscellaneous items.
As you work to organize a space, it’s important to physically move items that don’t belong in that space to the place they do belong, or as I like to say, their ‘home.’ It’s easy to make piles to move later, but I promise you that will only lead to more frustration. Move those piles—follow all the way through.
Once you’ve sorted and condensed the items at your workspace, sit down and really soak things in. Is this workable for what you need to accomplish? What are you missing? How is the lighting? What is sitting on this desk that you don’t actually use and never will?
Answer these questions honestly and then work on solutions to them. If the lighting is too dim, find an extra desk lamp. If there are too many picture frames, hang some up around the space instead.
Enjoy this space!

Bringing Order to Craft Supplies
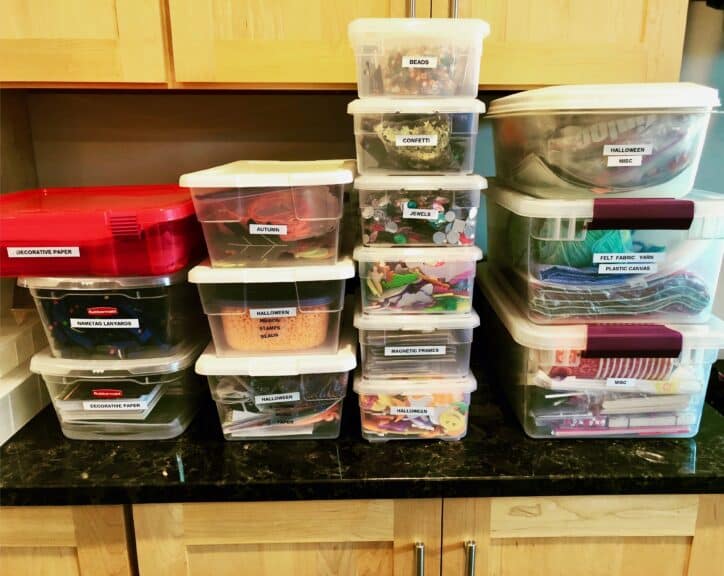
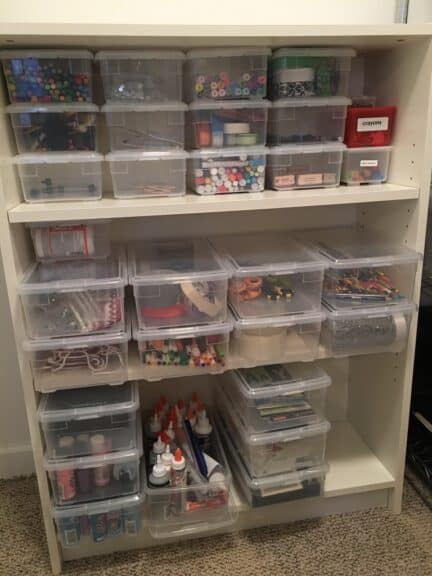
Find a cabinet, large drawer, or shelf that you can dedicate to craft supplies. I am a firm believer in purchasing clear bins with lids in a variety of sizes—from shoebox size and smaller—for this next step. Sort all supplies and give each supply type its own bin. I’m talking pencils, pens, staples, paper clips, scissors, clear tape, rulers, erasers … each its own home with a lid.
When choosing containers, match the size of the container to the size of the item to be stored in it. Shoebox sizes are good for rulers, chenille wire stems, and other longer items. Paperclips go in the tiniest bin you can find. Smaller bins can be placed in larger ones to save space.
This is a great solution if your storage space is limited. If you’re tight on space, look for a larger clear bin with a handle in the lid. Portable supplies! This might be a great option for individual classroom supplies.
Taking the time now to organize and stock up on these supplies will help keep future chaos at bay. Also remember to restock items when you run out of them, always keeping your supplies plentiful.
Taking the time now to organize and stock up on these supplies will help keep future chaos at bay.
Benefits of Being Organized
Every time I have organized any kind of space, there is always room for new at the completion of the project. The possibilities are inspiring.
An organized space lends itself to a calmer owner of that space. Why? Because everything has a home in that space, making it easier for you to maintain that space.
When you know where things are and how much of something you actually have, your world will be a little bit calmer.


